QUICK
SETUP →
MOON SMART
FOCUS.
A short, direct guide to setting up, running, and rebooting the Moon system on a LENSO rental —
Three pieces.
One signal chain.
Every Moon kit is built from the Eyes (3D sensor mounted on top of the lens), the Brain (processing, Wi-Fi, and serial output to the LCS), and the App (control — also runs on iPad or any browser). Knowing what each piece does makes setup and on-set diagnosis instant.
Eyes
Intel RealSense 3D sensor, factory-calibrated with a unique file called "glasses". Captures a depth map 30 times per second. IR projector effective up to 4 m in low-light scenes.
Brain
Anodized aluminum housing. Hosts the Wi-Fi hotspot, runs the tracking algorithms, and sends distance data to the LCS over a serial cable. Accepts 12.5 V or 24 V; 3 A is the target. 2 A is the absolute minimum and leaves little margin for drops.
App
Ships with a Sony PDT-FP1. Multiple devices can connect at the same time — useful for DP-on-monitor + AC-on-handset workflows.
RIG
A standard ARRI rig. The Brain feeds data to the LCUBE, which drives the lens motors, while a clean 12 V line keeps the Brain stable. Always power the Brain on its own — sharing the camera D-tap is the fastest way to trigger the voltage drops described in section 04.
Eyes → Camera
Mounted on top of the lens, USB-C to the Brain.
Camera → Motors
Cable from camera to the first lens motor.
Brain → LCUBE
Serial cable. Select the protocol in the Moon UI.
Motors → LCUBE
Motors are daisy-chained; a single line goes out to the LCUBE.
Extra power
Dedicated 12 V to the Brain — never shared.
FIVE STEPS TO START.
Run these steps in order on every new rig. Should take under ten minutes.
Power the Brain — clean and stable
The Brain accepts 12.5 V or 24 V. Aim for 3 A; 2 A is the absolute minimum and leaves little margin — below that you'll see random connection drops or a "can't target" state that looks like a software bug — it isn't.
- Use a dedicated power line — don't daisy-chain off the camera D-tap. We recommend powering via Fischer 3-pin, with D-tap as a second option.
- Boot the Brain before connecting the App, so the Wi-Fi channel scan can complete (~30 s).
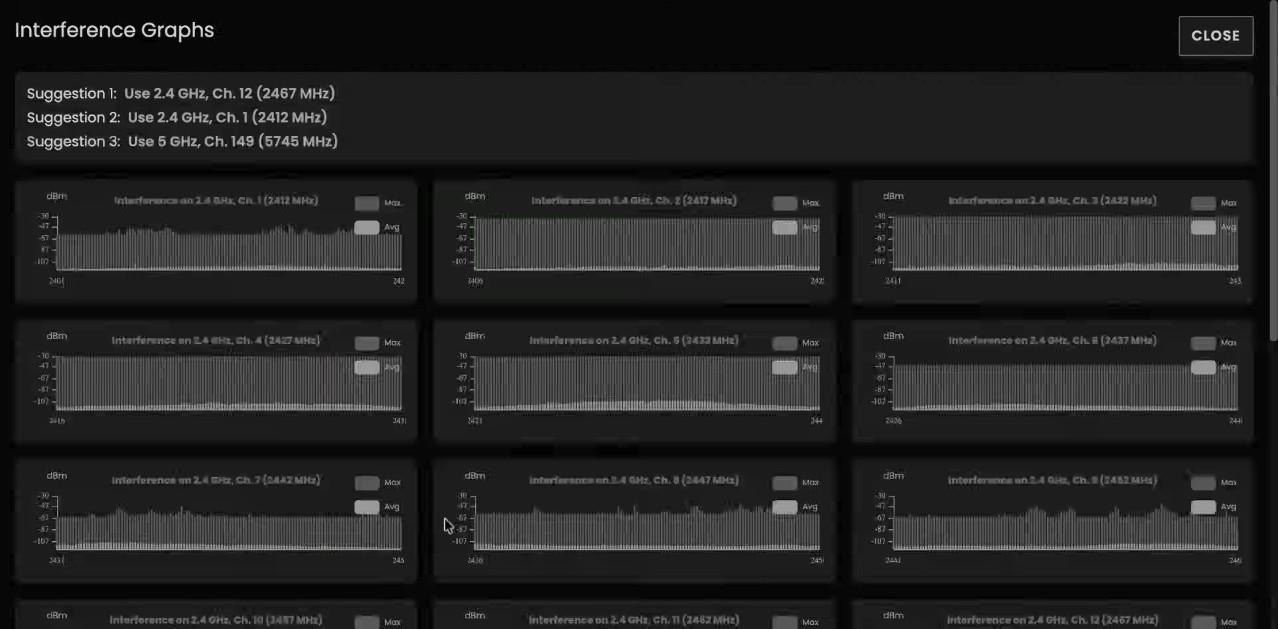
Wi-Fi — let it pick the best channel
The Moon hotspot offers 2.4 GHz and 5 GHz. On set, conflicts with Teradek and lighting are the norm, not the exception.
- Settings → Wi-Fi → enable Update to best channel (scans both bands at boot).
- If lag shows up mid-take, fire a manual scan. Wait ~30 s. Pick the channel with the least white in the spectrum (white = average signal strength).
- Moon does not channel-hop automatically. Hit Update Now if a nearby Teradek starts misbehaving.
- Full connection loss → unplug and replug Brain power. Faster than any other fix.

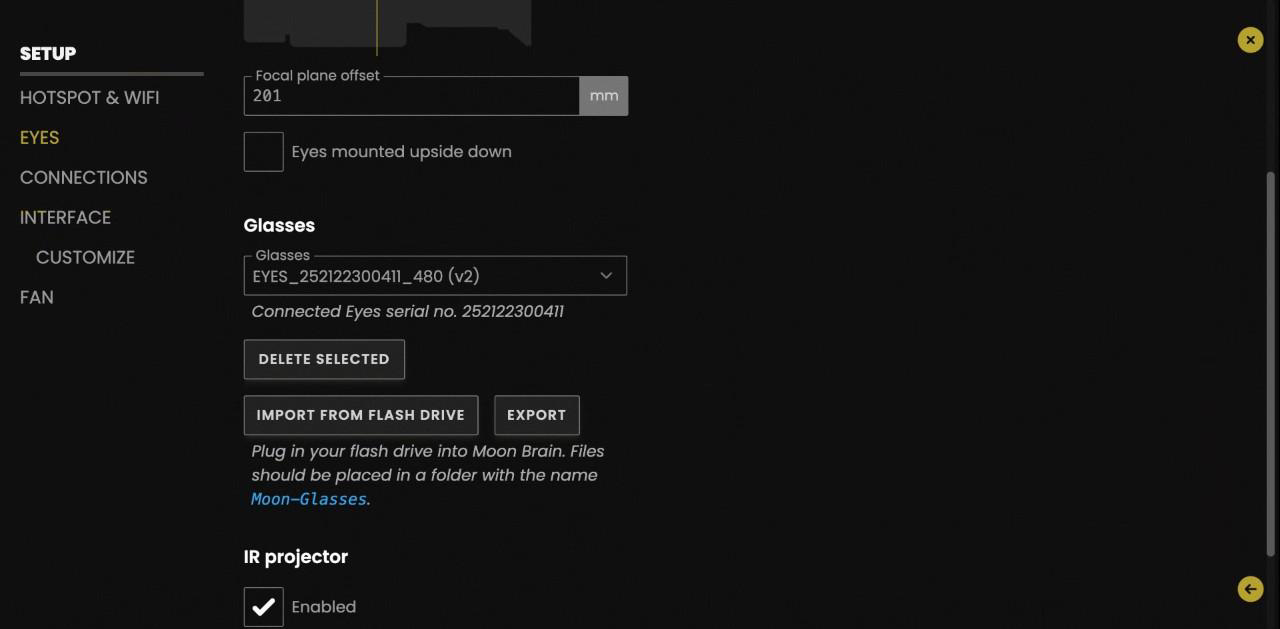
Focal-plane offset — the only critical calibration
Measure from the Eyes sensor plane to the camera focal plane, in millimeters. Enter it under Settings → Eyes → Focal-plane offset.
- Use a negative value if the sensor sits behind the camera focal plane.
- You can also switch between metric ↔ imperial here if the AC prefers feet/inches.

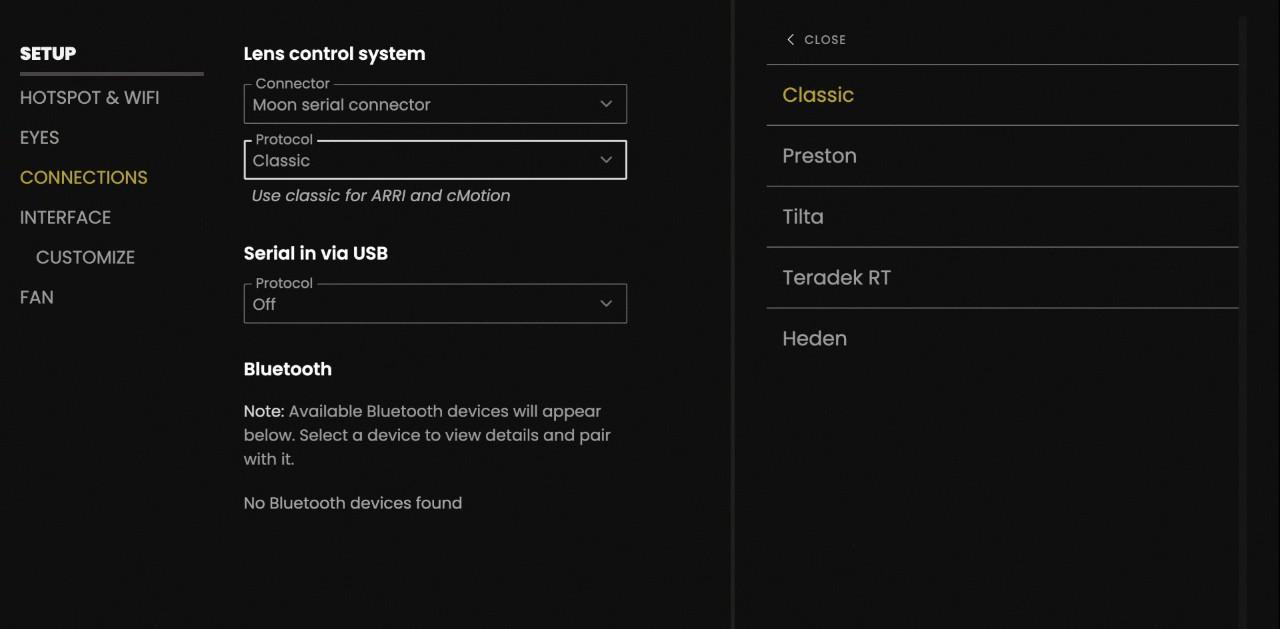
Select the LCS protocol
Settings → Protocols. Choose the family that matches the handset on set:
- Classic → Cinetape, ARRI, cMotion (the default after a factory reset).
- Preston → HU-3 / HU-4 with MDR-3 / MDR-4.
- Wrong protocol = no distance shown on the handset. Data goes out, but the handset can't read it.
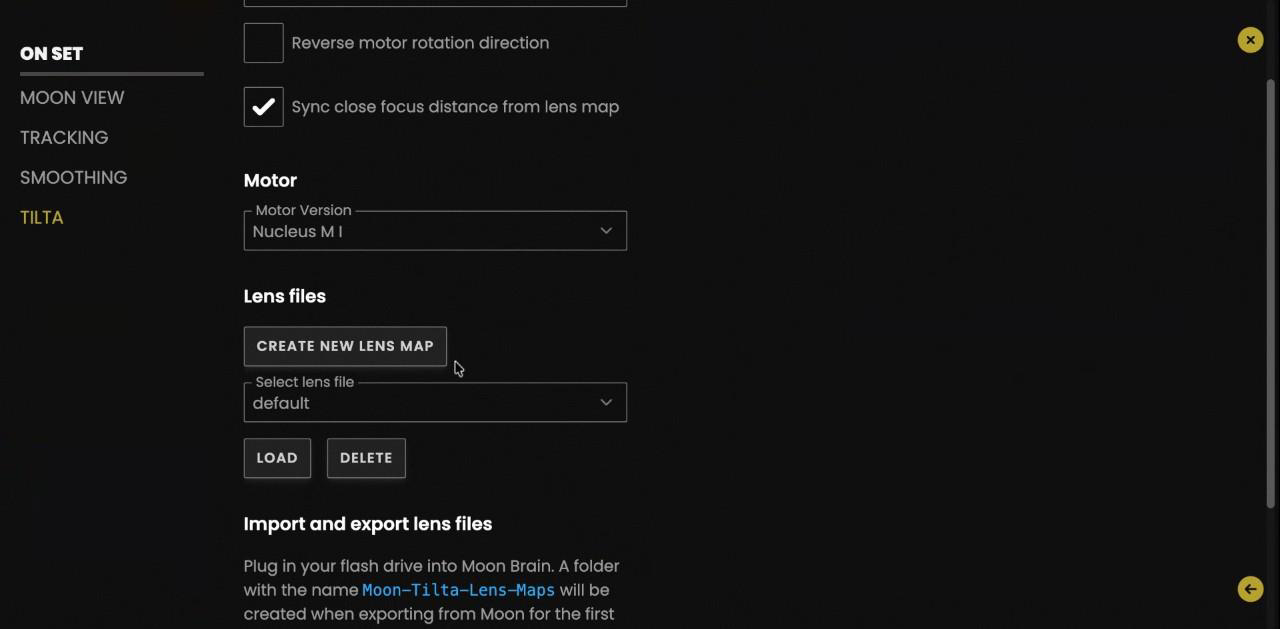
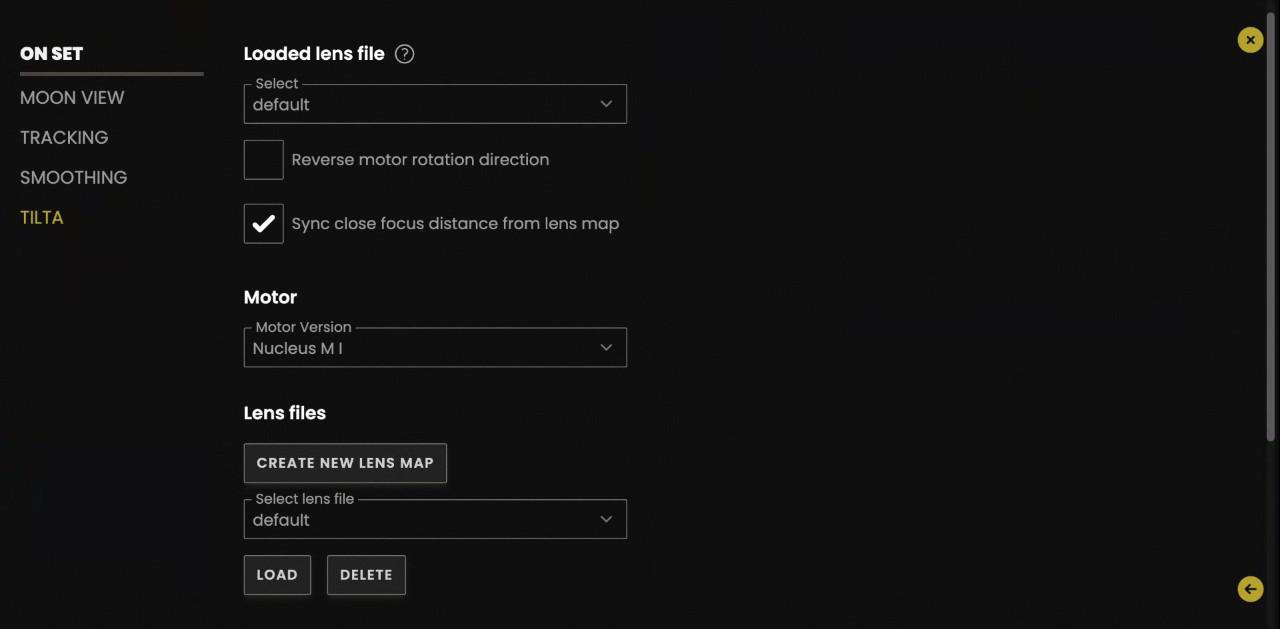
Tilta — manual lens mapping
Tilta handsets can't store lens data, so the Moon has to hold the map. For every supported lens used with Tilta, create and save a custom map in the Moon UI.
- Name lenses descriptively and without spaces (the Moon UI rejects them): "Vantage_One_T1_35mm", not "kitty one".
- When swapping lenses on a Tilta rig, the AC must re-select the correct map: Settings → Tilta → Lens file.
- ARRI and Preston handsets store their own lens data — no mapping required.
Pick the right mode
or you'll lose the data.
Four modes, each with a different power profile and data behavior.
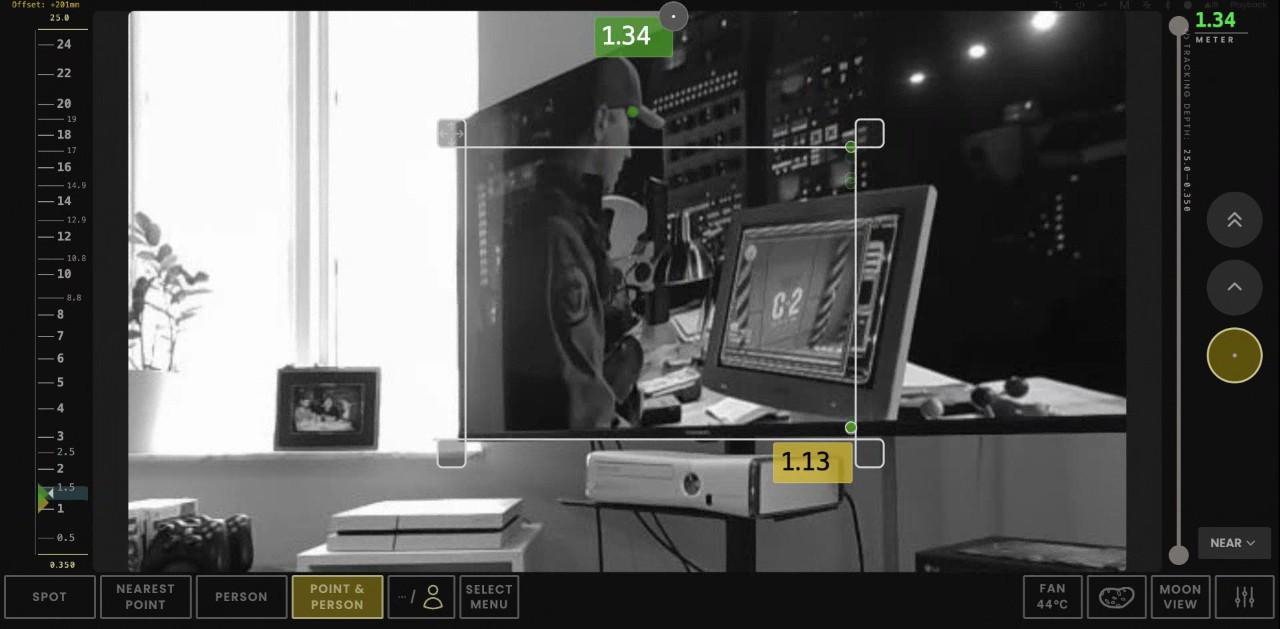
Nearest Point
Returns the distance to the nearest point inside a resizable frame. Looks for objects, not eyes — useful for product shots, gun barrels, props.
Low draw · no AIPerson
Detects only eyes and bodies. Efficient for actor work — but if the actor leaves the frame and only an inanimate object is left, tracking data drops.
High draw · AIPoint & Person DEFAULT LENSO
The hybrid. Tracks people and falls back to the nearest point if the actor leaves the frame. Continuous data — the mode we deliver by default.
High draw · AISpot
Tap any visible point — Moon returns and tracks the distance to that pixel. The fastest way to grab a mark during a take. No AI, very light on power.
Low draw · no AISave battery between takes
Tap the active mode button again to disable all processing. The Brain stays alive on the video feed only, in minimum draw — no need to power it down between setups.
TUNE FOR THE AC.
Most ACs touch the same settings. Save them as a preset so the next job starts from the right baseline.
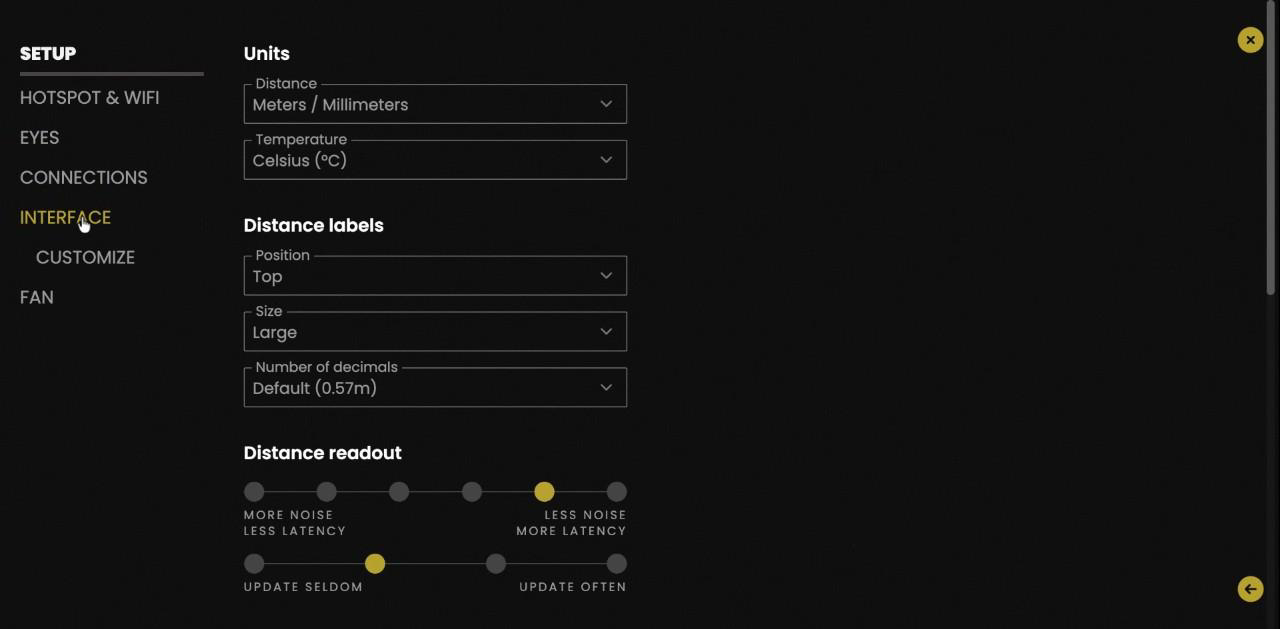
Distance readout
- Label size
- Settings → Interface → Label size
- Decimals
- 0, 1, or 2 — per AC preference
- Update speed
- "Less noise" = steady reading, "More noise" = constant update
- Distance scale
- Usually
OFFfor ARRI — the green mark already shows on the Hi-5 / WCU scale
Sensor & exposure
- IR projector
- Default
ON. Effective up to 4 m. Disable if the red flash is visible to camera or actor. - Exposure field
- Yellow frame = active exposure region. To clear it: re-enable exposure → maximize → disable.
- Manual exposure
- Tap
Mfor manual control. - Tracking depth
- Min/max range filter. Accidentally on = no data. Always maximize before handover.
When it's wired.
A BitBox avoids the Wi-Fi mess on high-stakes productions. The Moon has to act as a router on that subnet — not as a DHCP client.
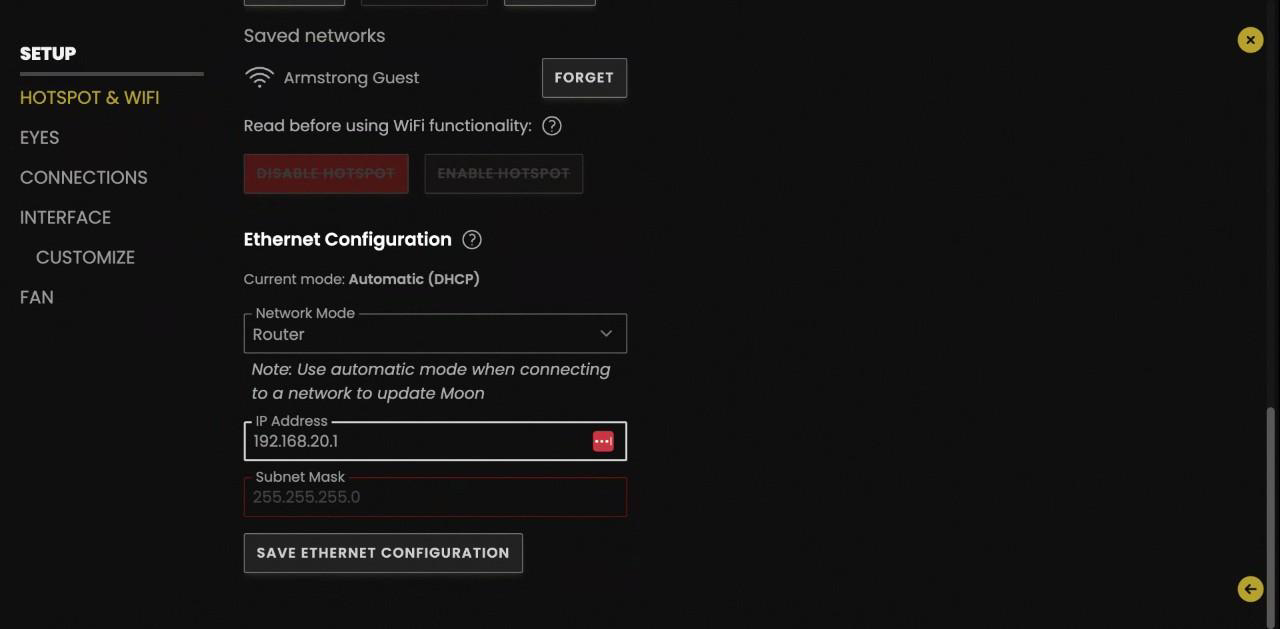
BitBox connection
- Network mode
- Change from
Automatic (DHCP)→Router - IP Address
192.168.20.1(or any unique value)- Subnet mask
255.255.255.0— enter manually
Ethernet update mode
To update the Moon firmware over Ethernet, switch network mode back to Automatic (DHCP). After the update, return to Router if BitBox is in use.
Static IP exists but is rarely needed — only certain DITs ask for it.
Alternative: external Wi-Fi
Studios with solid infrastructure: turn off the Moon hotspot and join the studio network. The App device must be on the same network to discover the Brain.
First-line triage.
The most common AC questions and the fastest fix for each. Power and Wi-Fi cover ~90% of the problems.
| Symptom | Likely cause | Fix |
|---|---|---|
| App can't find the Brain | Wi-Fi hung, hotspot down. | Unplug and replug Brain power. Faster than any software fix. |
| Connection drops during the take | Voltage below 12 V or current below 2 A — source on the edge. | Swap to a fresh battery or dedicated line. Confirm 12.5 V · ≥3 A (target); 2 A is the absolute minimum. |
| Lag or stutters after boot | Wi-Fi channel saturated by Teradek / lighting. | Settings → Wi-Fi → Update Now. Wait 30 s for the scan. |
| No distance on the handset | Wrong protocol. | Settings → Protocols → set to the handset family (Classic / Preston). |
| ARRI: handset with no distance data even when everything is correct | Occasional glitch in Classic protocol negotiation or on the LBUS to the LCUBE. | 1. Settings → Protocols → exit Classic and re-enter.2. If it persists, unplug and replug the LBUS cable to the LCUBE. |
| No distance data | Tracking depth filter active and tight. | Settings → Tracking depth → maximize the range. |
| Permanent yellow frame | Exposure field still active. | Enable exposure → maximize frame → disable. |
| Tracking loses the actor onto an object | Mode set to Person. | Switch to Point & Person for continuous fallback. |
| Locked out of Wi-Fi on return | Client changed the hotspot password and didn't share it. | Factory reset (System Info → Factory reset). Presets are preserved. |
| Wrong DoF after a Tilta lens swap | Lens map wasn't re-selected. | Settings → Tilta → Lens file → pick the new map. |
Before it goes back on the shelf.
Run through every item. Tap each row to mark it done — stored in this browser. Stops the next AC from starting with another production's settings.
Country of operation — legal note
Some clients change the country (US, AU, JP) to bypass EU power limits. Operating that way in Spain is illegal. Always reset to country of origin on return — liability falls on LENSO.